How To Identify Fertilized Ghost Shrimp Eggs-4 Things to look
Compared to all other aquatic living beings, perhaps ghost shrimp is one of the most unique choices for you. They are a better option to add to your fish tank with their transparent body while serving you as a cleaner of the tank and a food source for bigger fish and other creatures at the same time.
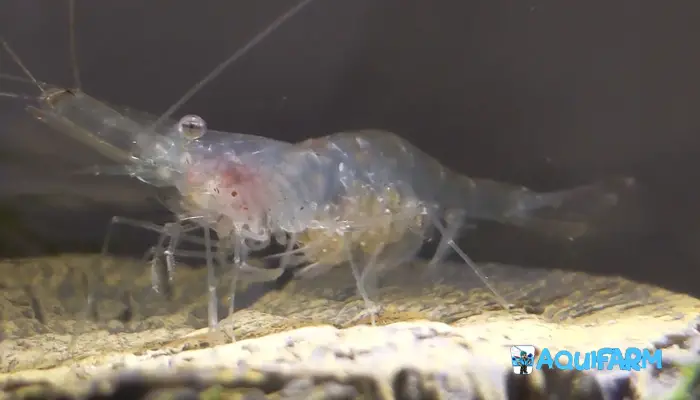
If you find your ghost shrimp eggs are turning white or pale yellow from green, it means they are fertilized. On the other hand, notice the position of the eggs. If they are downwards to the tail of the female shrimp, you find black specks on the eggs (eyes and stomach), or the shrimp tends to avoid the bottom of the tank – all these indicate the fertilization of the eggs.
Read this post to get the idea as a beginner or get rid of your confusion if you have earlier experiences. This post will truly help you out in terms of the breeding of ghost shrimp as well.
How to Tell if Ghost Shrimp Eggs are Fertilized
Female ghost shrimp’s pregnancy time varies due to the temperature of the tank water. They tend to get done with the pregnancy in a warmer environment. The preferable temperature is around 70 degrees F.
In lower temperatures like around 60 degrees F, they take longer (double or more) to accomplish the pregnancy. Whatsoever, the pregnancy phase can be divided into 3 stages.
Considering that you provide your ghost shrimp preferable (warm) environment, they will take up to 3 weeks for pregnancy. Now, we will take a closer look at those three specific weeks individually.
Week 01
This is the time when you will first get to know that your female ghost shrimp is pregnant. Having a transparent body, the eggs are seen from the outside with a closer look.
Since this is the very first stage of the pregnancy, you will get to see nothing but the existence of the eggs. Your ghost shrimp will look a bit larger in size. At a glance, they might seem like they have taken a huge meal.
With a closer look, you will get to identify the eggs. You will see little green dots on the shrimp’s saddle. To be specific, look for those dots close to the base of her abdomen.
Week 02
Comparatively, this is the most vital period of pregnancy. Because this is the time when the eggs get fertilized. But you won’t be able to recognize them immediately after the process that they are already fertilized. You need to wait a while more to see the signs of fertilization.
In week 02, the eggs will be a bit faded. In other words, they will lighten in terms of color. That’s an indication of the eggs becoming white from green.
The eggs will start moving towards the tail of your ghost shrimp down the legs. Usually, during this week, fertilization takes place by the male shrimps.
Week 03
This is the very last stage of the pregnancy. By this, the eggs should’ve been fertilized.
Though the eggs have been fertilized earlier, there has been no such specific and vivid indication of the event. But when it comes to the third week, you will start noticing changes.
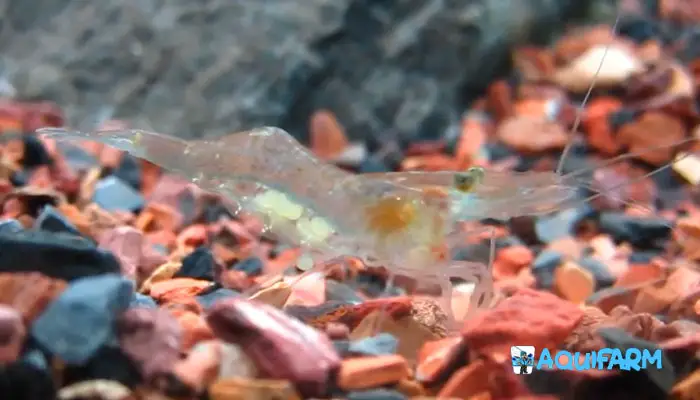
The very first change happens in the color. The fading process that started earlier in the second week will come to an end while turning the eggs white or pale yellow finally. This is a clear indication that the eggs are fertilized.
With a closer look at those fertilized eggs, you will get to see some black dots. Those dots are the representation of the eyes and stomachs of the upcoming baby shrimps. Don’t misunderstand these black specks as a defect of the fry.
By the end of the third week, the fry tends to hatch from the eggs. Though it’s a spontaneous process, things work better if you take some initiative on your own to facilitate the process.
The Very Specific 4 Signs to Identify Fertilized Ghost Shrimp Eggs
You must’ve already had an idea to identify yourself whether the ghost shrimp eggs are fertilized or not. Let me straighten things up for you for further convenience:
- The eggs (earlier green) will start fading and turn white or pale yellow.
- Eventually, the eggs will start moving toward the tail of the mother ghost shrimp from the abdominal part. It can be said to observe the lower side or the underside of the shrimp.
- If you fail to identify all those, wait a bit. You will see black dots on the eggs as a remark of the eyes and stomach of the baby shrimp.
- Check the mother shrimp’s behavioral pattern.
Let’s have a detailed discussion on these 04 (four) specific factors as follows:
The color of the eggs
Since you are to breed ghost shrimps, it appears as a must for you to know and be able to identify the difference between unfertilized and fertilized ghost shrimp eggs. And the simplest way is to consider the color of the eggs.
Unfertilized eggs are greener in color compared to fertilized ones. On the other hand, fertilized eggs appear white or pale yellow depending on the color of the mother shrimp.
The underside of the shrimp
Unfertilized ghost shrimp eggs are definitely smaller in size than fertilized ones. So, when you find that the egg size is getting larger gradually, it’s because of fertilization. And you can identify it by taking a closer look at the underside of the mother shrimp.
On top of that, there is a clear difference in the positioning of fertilized and unfertilized eggs. If the eggs are yet to be fertilized, you will find them somewhere more top side of the shrimp. This zone is identified as the abdomen of the shrimp. It can be referred to as the saddle as well.
But the fertilized eggs will appear more downwards of the shrimp’s abdomen. And the very area of the shrimp is known as the swimmerets. Take a look at the downward of the bottom side of your ghost shrimp, and find out yourself.
If it appears difficult for you to identify the zones, simply check whether the eggs have got lowered to the shrimp’s tail end or not compared to the place you found them earlier.
The tiny black specks on the eggs
This is the ultimate indication of the fertilized shrimp ghost eggs. After the fertilization is done, it will take a few days for the eggs to have the indication of eyes and stomach on them.
And the indication is made through tiny black spots. If you can acknowledge the black dots individually, you’ll get three dots on them. Don’t mistake the dots as any defect rather they symbolize successful fertilization.
Mother shrimp’s behavioral pattern
The behavioral change in the mother shrimp also gives you a message about the pregnancy. Though the change in the behavioral pattern isn’t that much, yet you will get a notification that the shrimp is about to give birth – which means fertilized eggs!
The indication is that, prior to giving birth to new shrimps, the mother shrimp will start avoiding the bottom of your fish tank. They’ll swim away from the bottom and rub or hit the fertilized eggs with their forelegs.
The mother shrimp does this with a view to helping the upcoming baby shrimps leave their embryonic sacks. Thus, if you find your female pregnant ghost shrimp trying to move the eggs around, rubbing or hitting the eggs, take it as a positive sign.
The eggs have been fertilized successfully and every single fry is ready to hatch.
Fertilization
The fertilization part is a joint job done by both male and female shrimp. None alone can do it. However, there are a few things to look after or ensure to rate the process.
The initial stage is providing the shrimp with a friendly environment. You can install some aquarium decorations in order to serve the purpose. You can have some artificial moss, plants, and rocks in your fish tank to ensure a more natural environment for your shrimps.
How to Breed Ghost Shrimp Eggs on Your Own
After the fertilization of the eggs, they will start to hatch and have their individual identity as baby shrimps. Though fertilization has taken place successfully, it doesn’t guarantee breeding.
You need to undertake some other measures to ensure proper breeding. The most important thing to give attention to is that the newly born baby shrimps appear as a great source of food (protein) for other aquatic creatures. Your jaw might drop if you have a fresh aquarium to know that. The mother shrimp also consumes baby ghost shrimps as their food!
Therefore, they must be separated if you wish to keep them alive. They should be put into a breeding tank to follow and ensure a healthy environment for them to grow.
Even so, you need to match the breeding tank environment with the earlier one to keep the baby shrimp alive. This includes pH level, temperature, tank decoration, lighting, water parameters, etc.
Let’s have a specific direction regarding that:
Preparing spawning tank
First and foremost you need to set up your breeding or spawning tank. Fill it with water and let the water rest for 24 hours. This will eliminate potential threats like chlorine and other harmful chemicals.
Match the water environment with the earlier tank from where you are about to relocate the baby shrimps. It’s because of the weak adaptation power of the baby shrimps.
While preparing the tank, keep the decoration in mind. There should be free water flow to ensure the oxygen reaches the eggs properly. The scenario might be different in the case of ghost shrimp of different species. Some may prefer closed spawning areas and you need to provide them by using plastic containers or dishes.
Have some water plants to ensure the shading for the babies. On the other hand, keep some water weeds to mitigate the issues arising from ammonia and nitrate pollutants!
Moving the mother shrimp to the tank
When your spawning tank is ready and kept resting for 24 hours, you need to move the mother shrimp to the spawning tank. Ensure no harm to the eggs during the transfer process.
Remember that, it’s necessary to keep the mother shrimp in shallow water so that the eggs can cling to the abdomen easily. Don’t forget to feed the female in the newly set up tank!
Separation of the mother from the eggs
As soon as the eggs are deposited and the female shrimp no longer has eggs on her, it’s time to remove the mother shrimp from the spawning tank. This needs to be done for the safety of the babies.
If you keep the mother with the babies, the female shrimp will most likely start considering the babies as her food source. And eventually, she will eat those babies as a source of protein.
Keep the female shrimp in the earlier tank until she’s ready to spawn again. You might go for detaching the eggs from the mother shrimp but keep in mind that this act might be harmful to the shrimp. In this process, the mother shrimp gets to clean her body from the eggs’ mucus.
Maintain water parameters
At this stage, you need to stabilize the water environment of the spawning tank and maintain the parameters consistently. You need to better equipment for the job.
Maintain the temperature somewhat between 65 – 82 degrees F (18 to 28 degrees C). Besides that, keep the pH level ranging from 7.0 to 8.0. Don’t let the dissolved oxygen level decrease. Don’t forget about overstocking, overcrowding, etc as well.
Keep the hardness somewhere between 3.72 to 6.75. There should be a 12h lighting cycle for your spawning tank.
Keep the newly hatched fish alive
By maintaining all the earlier stuff, the eggs will be hatched. Now it’s your job to ensure their sound growth. You must provide food for them to keep them growing.
They need protein and other necessary nutrients for their growth. Provide them with flake fish food or any other commercial food available for baby shrimp.Use some algae to meet the demand for vegetable matter.
In the early days, feed them several times a day. As the day passes, start following the rule of thumb. Feed them one to two times a day regularly. Don’t feed them too little or too much!
Do a water change of up to 15 to 25% a month. Keep the following parameters for amazing results:
- Ammonia: 0 ppm
- Hardness: 3.72 – 6.75
- Nitrates : <20 ppm
- Nitrites: 0 ppm
- Oxygen: At a high level.
- pH level: 7.0 – 8.0
- Temperature: 75 – 80 degrees F.
Frequently Asked Questions (FAQs)
How to save eggs from dead shrimps?
If your pregnant ghost shrimp died by any means, you have the chance to save the eggs. The eggs need oxygen to remain alive and eventually hatch! Replace the fanning process of the eggs with the DIY shrimp egg tumbler. Build the tool, remove the eggs from the dead shrimp, and put them into the tumbler.
What are black ghost shrimp eggs?
Actually, ghost shrimp eggs have colors like green, white, and pale yellow depending on whether it’s fertilized or not! There are no such black ghost shrimp eggs. But after fertilization, before hatching they have black dots on them. These dots are the sign of fertilization and the reflection of the eyes and stomach. For these dots, the eggs appear in black.
Do mother ghost shrimp eat their own babies?
Unfortunately, the answer is yes. After hatching, if the mother shrimp is still kept with the babies, she will start eating them as a source of protein. Basically, ghost shrimps are brought up as a source of food for other creatures. But the older ones tend to eat the newly born ones as well. That’s why it’s suggested to keep the babies apart from other creatures, even from their mothers.
Conclusion
Having ghost shrimp in your fish tank helps you in many ways. Apart from being a part of the decoration, it also works in cleaning the tank. On top of all, they are considered and used as a great source of protein for other creatures. Therefore, breeding them is profitable for you.
However, being a beginner at dealing with ghost shrimp, you must know the process to breed them eventually on your own. For the process, you must learn how to identify the ghost shrimp eggs when they get fertilized.
Now you know the specifics to do for the breeding. Apply the simple DIY methods while keeping in mind the different phases and requirements. Maintain the tank environment properly for better results.
- Indoor Fishkeeping – The Ultimate Guide To Building A Thriving - July 25, 2026
- Fishkeeping Checklist – Your Step-By-Step Guide To A Thriving - July 25, 2026
- Best Automatic Feeders For Betta Fish – The Ultimate Guide To - July 25, 2026